Pages

Showing posts with label quick and easy cooking. Show all posts

Wednesday, September 19, 2012

Tomato Soup and Ritz Crackers

Some days are meant for the simple stuff. No obscure rare ingredients, no 14 step recipes, no foreign spices with names you can't pronounce and rest of the world could never begin to find. Some days are meant for the foods that remind you of an easier time, perhaps a time when your mom, grandma, dad or grandpa made you sit at the table and eat your entire lunch before you were allowed to hop back on your bike or go outside and roll around in a big pile of leaves.

As soon as there's a nip of chill in the air, it's soup time in my book, and when I was little, my mom used to make the best tasting tomato soup. I'm not talking homemade tomato soup from freshly picked summer tomatoes, but rather the real dirty kidlet stuff, as in a can of Campbell's condensed tomato soup cooked on the stovetop with another can milk added to make it nice and creamy. Yeah, it's full of sugar and sodium, but holy heck, it sure tastes good, especially with salty, crunchy Ritz crackers crumbled on top for texture.

Canned tomato soup and Ritz crackers. This is still my go-to meal even though I'm now all growns up. In fact, I am eating a big bowl as I write this post. What's your go-to kiddie meal? Better yet, how do you like to eat your tomato soup? Crackers, grilled cheese or Goldfish?


©2012 Fatback and Foie Gras. All rights reserved. This material may not be published, broadcast, rewritten or redistributed without permission.


Pin It Now!

Friday, March 9, 2012

First Cooking Show Segment: BLT Deviled Eggs Recipe

So, my first cooking segment with The Virginia Farm Bureau's monthly program "Real Virginia" which features Virginia-focused agricultural news, profiles as well as gardening segments is officially up and running. About a month ago, I was contacted by the Farm Bureau to step in for Chef John Maxwell (who has since taken a teaching position in Florida) as the new culinary segment host for "Heart of the Home", a televised cooking demonstration featuring the best of Virginia's produce, meats and locally made products.

We spent an afternoon shooting three segments at Sur La Table at Stony Point which houses my dream kitchen as well as a collection of cooking tools worth weeping over. If you haven't taken a cooking class there yet, by all means do. By the end of the day, we had all three segments in the can including this recipe for BLT Deviled Eggs, which essentially combines all the deliciousness found in a bacon, lettuce and tomato sandwich and stuffs it into a classic Southern-style deviled egg. It's a great recipe that's super easy to make, and man oh man, is it satisfying. Salty bacon meets creamy eggs yolks and home-canned bread and butter pickles for a sweet and savory combo that really hits the spot. Be sure to visit your local farmer's market to buy some Virginia farm-fresh eggs for this one. Check out the full recipe below or visit Heart of the Home online. In the meantime, check out the video.


Not my best "still" shot here ;)

Sweet and Savory BLT Deviled Eggs


Makes 12 deviled eggs

6 large hard-boiled eggs, peeled
2 tablespoons mayonnaise
½ teaspoon Dijon mustard
1 tablespoon bread and butter pickles, finely minced
3 slices bacon, cooked and crumbled into small bits
Pinch of cayenne pepper
Salt and freshly ground black pepper, to taste
6 cherry tomatoes, sliced in half
A handful of shredded iceberg lettuce, for garnish

Slice eggs in half long ways and pop out the yolks. In a medium-sized bowl, mix together yolks, mayonnaise, Dijon mustard, bread and butter pickles and bacon. Add cayenne pepper, salt and black pepper, to taste.

Fill a piping bag or plastic storage bag (with the corner snipped off) and pipe filling into each of the eggs. Hint: place eggs on a paper towel so they don’t slide around while you fill them.

Once you’ve used up all the filling, assemble eggs on a platter and top each one with a cherry tomato half. Then sprinkle each egg with a little shredded iceberg lettuce. Chill until ready to serve.

©2011 Fatback and Foie Gras. All rights reserved. This material may not be published, broadcast, rewritten or redistributed without permission.
Pin It Now!

Sunday, January 22, 2012

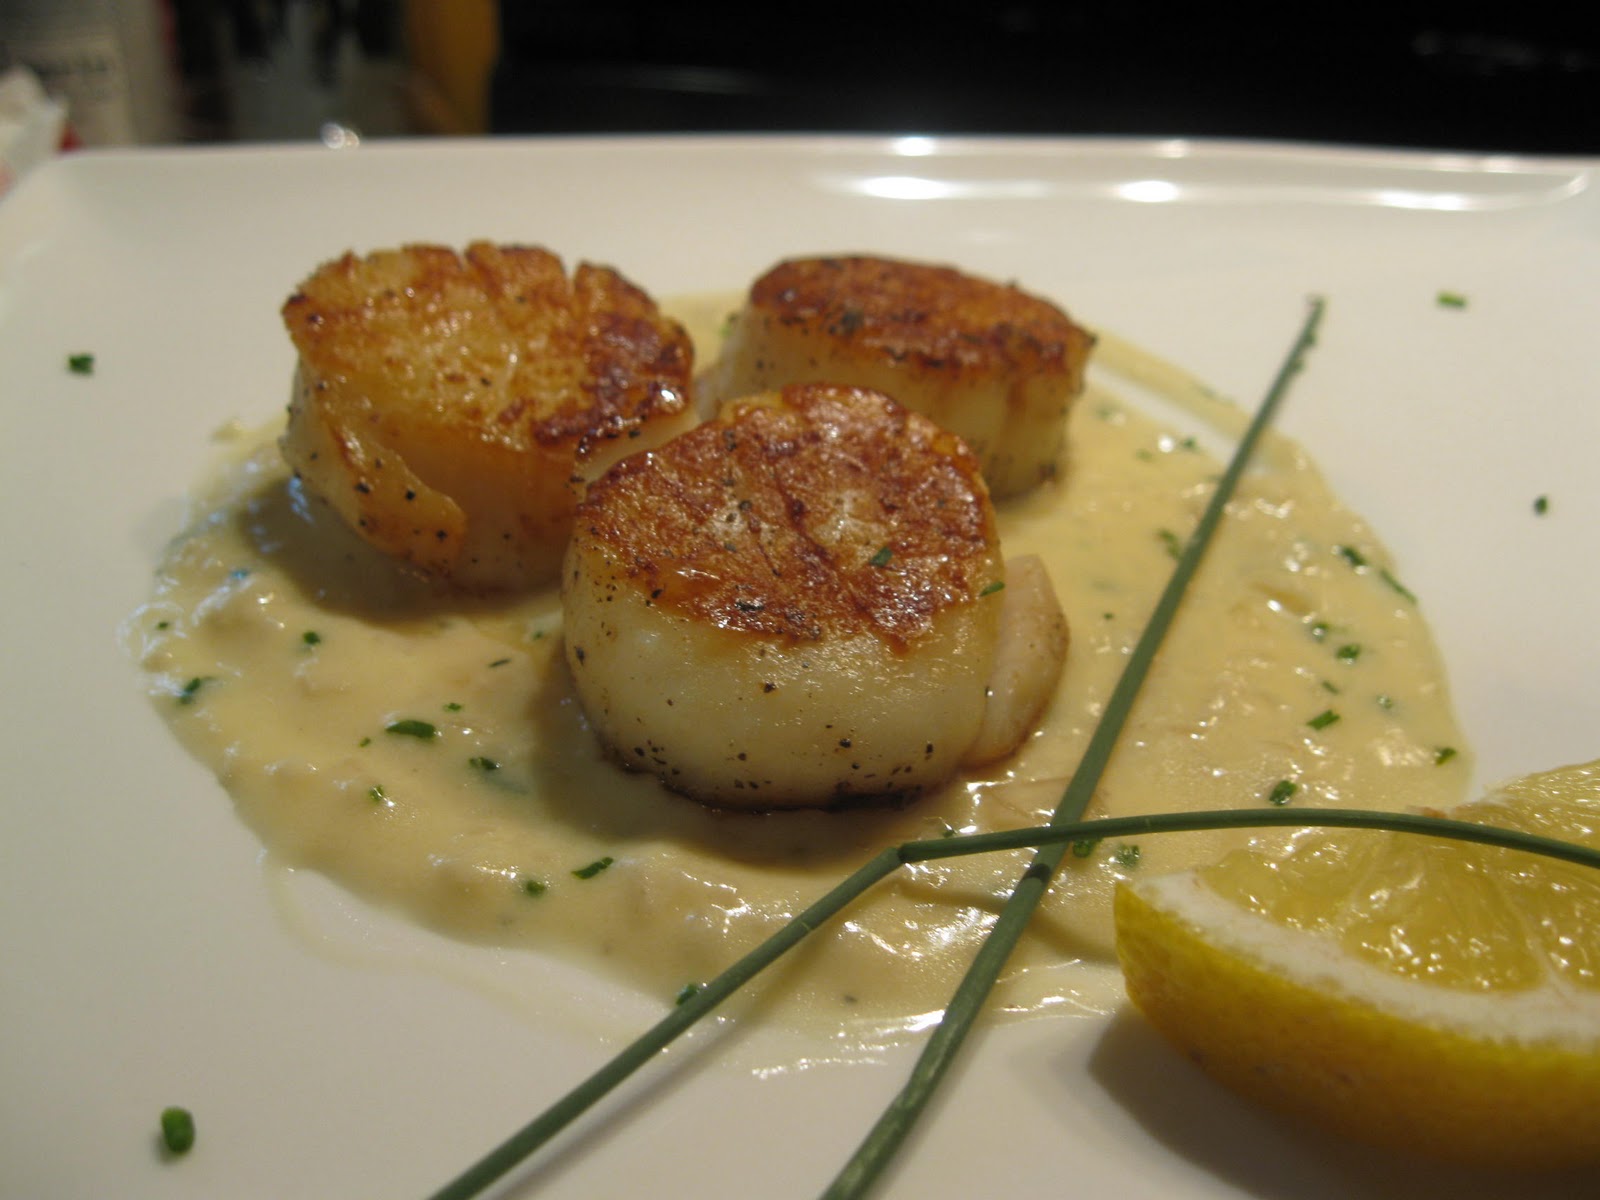
Pan-Seared Scallops with Chive Beurre Blanc Sauce Recipe

Cast-iron seared scallops rest atop a chive-infused buttery, creamy pillow of goodness.
Seared "dry-pack" scallops meet butter, cream, chives, shallots and wine. What's not to like? This super-easy recipe makes for an elegant presentation that simply screams, "I busted my ass in the kitchen all day" but alas, you really didn't. Why? Because this sauce can be whipped up in minutes, and as along as you have a screaming hot pan, your scallops will be expertly caramelized in no time as well.
But first. You must use a super-hot cast-iron pan and those suckers better be nice and dry and well-seasoned with salt and pepper on both sides. Once you got this in place, the scallops will take care of themselves, as long as you don't screw up and overcook them. The key here is, minutes on each side with the smaller, thinner scallops requiring a minute or less on each side. Pinch their little scallopy sides to make sure they remain nice and tender as you cook them, and take them out of the pan WHILE they are still just a bit soft in the middle.

For the beurre blanc, which is far from a traditional beurre blanc in that it contains cream and Dijon mustard as well as little to no real reduction, make sure your shallots are very finely minced. Also, avoid using any super-oaky white wine in this sauce since that will overpower its simple flavor profile.

Finally, feel free to play with this sauce a bit. If it's too thick add a bit more wine or incorporate any other fresh herbs you might have on hand (or none at all).

Now, go forth and make thee some scallops!


Seared Scallops in Chive Beurre Blanc Sauce

Makes 4 servings

For Sauce

1/3 cup minced shallots

1/4 cup dry, un-oaked white wine

1/4 cup champagne vinegar

1 cup heavy cream

1 tablespoon Dijon mustard

2 tablespoons minced fresh chives and extra chives for garnish

Salt and pepper, to taste

1 tablespoon softened butter

In a small saucepan, boil shallots, white wine and champagne vinegar on medium-high until most, but not all, the liquid has evaporated, about 4 to 5 minutes. Turn down heat to medium and whisk in heavy cream and mustard. Whisk constantly until mixture reduces to about 1 cup.

Strain sauce into another saucepan, pressing down well on solids. Discard solids and return saucepan to medium-low heat.

Add chives and season with salt and pepper. Turn heat down to low and whisk in butter. Remove sauce from heat and keep warm until ready to serve.

For Scallops

1 pound dry-pack sea scallops (about 12 scallops)

Sea salt and freshly ground pepper

1 tablespoon olive oil

Preheat a medium-sized cast-iron pan to medium-high.

Pat scallops dry with a paper towel and season both sides well with salt and pepper.

Add oil to pan. When it begins to shimmer and is almost the point of smoking add your  scallops. Cook scallops in on each side until nicely browned and caramelized. Be careful not to overcook.

To serve: spoon warm sauce onto individual plates and top with three scallops each. Garnish with a lemon wedge and fresh sprigs of chive.

©2012 Fatback and Foie Gras. All rights reserved. This material may not be published, broadcast, rewritten or redistributed without permission. Pin It Now!

Monday, January 2, 2012

Bakin' Bacon Recipe

Gets even better w/ poached eggs, buttery biscuits and Mimosas
I'm a bacon fanatic. Certainly, I am not reinventing the wheel with this declaration, but facts is facts. Bacon is a big part of my life, and over the years I've tinkered with many a bacon recipe, from frying it in cast-iron (deliciously greasy, but time consuming and messy) to microwaving (quick and easy, but too dry and often inconsistently cooked) so when I stumbled across this very cool recipe for baked bacon, I just had to give it a try. What intrigued me most about this version of baking bacon in the oven was that the author recommends starting the process in a cold oven, which if you think about it, makes total sense in that it facilitates a slower, more even cooking process from start to finish.

So, New Year's Day became all about baking bacon.

According to the directions, I started by wrapping a large ridged sheet pan in heavy duty foil. Then, I laid out all the bacon side by side. I recommend using quality thick-cut bacon for this recipe. Next, I popped the whole shebang into the oven (center rack) and THEN cranked the heat up to 400 degrees. You must be sure to put the bacon into a cold oven. P.S. If you're really feeling creative, at this point you can also drizzle bacon with molasses or sprinkle it with brown sugar and cayenne pepper before roasting it in the oven for additional flavor. (Thanks Karol Thompkins!)
Next, I roasted the bacon for approximately 20-24 minutes. Obviously, oven temps vary depending on the make, model, age and accuracy of your particular oven, but I ended up somewhere in that time range. Also, about three-quarters through the cooking process, I flipped the bacon over to promote more even cooking. One thing I did notice of culinary note is if your oven is a bit cockeyed (or perhaps the floors of your kitchen slope as mine do) the bacon resting in the rendered fat will cook faster than the rest of the meat. With this in mind, I recommend turning your pan at least once during the cooking process. This should be your end result:
After your bacon is done the way you like it, remove it to drain on paper towels (be sure to save your grease for making cornbread). Once the pan has cooled, simply ball up the foil and toss it away for easy clean-up.
Serve up your bacon with your favorite accoutrements. Store any leftover cooked bacon in ziplock bags in the fridge for BLT's, biscuit sandwiches or nibbling.

©2011 Fatback and Foie Gras. All rights reserved. This material may not be published, broadcast, rewritten or redistributed without permission.


Pin It Now!

Tuesday, December 27, 2011

Crostini Topped with Brie, Balsamic Marinated Strawberries and Arugula


This just might be the easiest and most elegant party appetizer of the season. I first tried this recipe at White Fences Winery in Irvington, Virginia, a small fishing town in the Northern Neck near the Chesapeake Bay. Sadly, the winery is no more, but this fantastic combination of oozy triple creme brie, piquant balsamic strawberries and peppery arugula on top of a crunchy crostini lives on just in time for your next New Year's Eve cocktail party.

If you're looking for a snazzy recipe to add to your holiday repertoire, I highly recommend giving this one a try.

Crostini Topped with Brie, Balsamic Marinated Strawberries and Arugula Recipe

Serves 12

2 tablespoons good quality balsamic vinegar
1/2 tablespoons sugar
1 1/2 cups of strawberries, hulled and sliced
Generous handful of arugula
Extra virgin olive oil
1/2 a sourdough baguette, sliced 1/2-inch thick
8-ounces triple creme brie brought to room temperature
Freshly ground black pepper

In a bowl, mix together vinegar and sugar until sugar is dissolved. Add strawberries. Cover and let sit for 15 minutes to marinate.

Meanwhile, toss arugula with a little olive oil to taste. Add a couple spins of the pepper mill and toss again. Set aside.

Lightly brush crostini's with olive oil and toast on each side.

To assemble: spread each piece of toasted baguette with brie. Then top with a couple of strawberries and arugula. Garnish with a bit of extra black pepper. Serve immediately. Repeat with any remaining ingredients.

©2011 Fatback and Foie Gras. All rights reserved. This material may not be published, broadcast, rewritten or redistributed without permission. Pin It Now!

Wednesday, December 14, 2011

Pot Roast with Bacon, Garlic and Rosemary

So meaty.
I am definitely a meat and potatoes kinda girl, especially when the temperature drops. I'm also one for quick and easy preparation as well as budget-friendly cooking since now I have my hands full with this little guy.
Hank likes meat, too.
Last night I set out to make something hearty, soul-satisfying, and most of all easy, so I came up with this little one-pot wonder-- Rustic-Style Beef Pot Roast with Bacon, Garlic and Rosemary.
Mise en place
Begin by searing your meat and cooking bacon. Discard half the drippings.
Next, saute onions and garlic.
Deglaze aromatics with a nice dry red wine, scraping up the bits off the bottom of the pan.
Add stock, water, tomatoes and rosemary.
Return meat and bacon to pot. Cook for about 2 hours.
Reduce sauce, add a slurry, slice and plate it up!

Rustic-Style Beef Pot Roast with Bacon, Garlic and Rosemary
Serves 4-6

This saucy pot roast is simply bursting with rich flavors. It gets its "rustic" stylings from rough chopping the aromatics (onions and garlic) and incorporating whole sprigs of rosemary that are tossed right into the sauce making this an easy to prepare weeknight dinner.

Ingredients:

2 pounds beef bottom round roast, trimmed of excessive fat
1 tablespoon olive oil
2 slices of bacon, diced
2 medium onions, sliced
5 cloves of garlic, smashed
1 cup good quality dry red wine
2 cups low-sodium chicken stock
1 cup water
1 (14-ounce) can of Italian cherry tomatoes (such as Rienzi brand)
2 sprigs rosemary
Salt and Pepper, to taste
1 tablespoon cornstarch
2 tablespoons cold water

Preheat a large dutch oven or cast iron pan to medium-high. Sprinkle beef with salt and pepper on all sides (going easy on the salt due to the use of canned chicken stock). Add olive oil to pan and sear beef well on all sides. Remove to a plate.

Add bacon to pan and saute until crispy. Then remove to a plate. Pour off half the pan drippings and discard. Add onions and saute 5 minutes. Add garlic and saute another 5 minutes. Deglaze pan with red wine, being sure to scrape up all the goody bits off the bottom. Next, add chicken stock, water, tomatoes and rosemary.  Finally, add bacon and beef back to pan. Add a little bit more water if necessary, so you can cover beef entirely. 

Bring sauce and meat back up to a boil for two minutes uncovered. Then lower heat, cover and simmer for about two hours or until nice and tender. Periodically, remove surface grease and fat with a spoon and discard.

Remove meat to a cutting board and let rest. Crank up the heat on your sauce and simmer for about 10 minutes. Season with salt and pepper and remove rosemary sprigs.

Mix together cornstarch and cold water to make a "slurry". Add slurry to simmering sauce and bring up to a gentle boil. Simmer for about another 8-10 minutes or until thickened.

Slice beef and plate. Pour sauce over beef and garnish with a rosemary sprig. Save any additional sauce for bread dipping or as a gravy for potatoes, polenta, rice etc....

Note: this recipe is really great served with mashed potatoes or a simple risotto!

©2011 Fatback and Foie Gras. All rights reserved. This material may not be published, broadcast, rewritten or redistributed without permission
Pin It Now!
Related Posts Plugin for WordPress, Blogger...